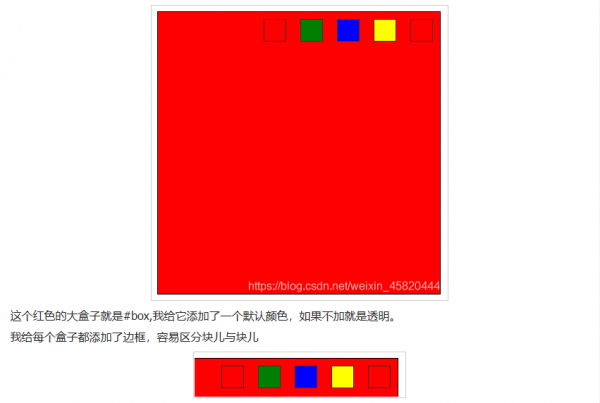
这篇文章主要介绍了前端html换肤功能的实现代码,本文给大家介绍的非常详细,对大家的学习或工作具有一定的参考借鉴价值,需要的朋友可以参考下
先把代码奉上,自取自用。直接创建html文件,直接粘贴进去就能用,不能用随便骂。
<!DOCTYPE html>
<html lang="en">
<head>
<meta charset="UTF-8">
<title>Document</title>
<style>
#box{width: 100%;height:100%;background-color: red;position: absolute;top:0;left:0;right:0;bottom:0;}
#box>div{float:right;width: 30px;height: 30px;margin:10px;border: 1px #333 solid;}
#box1{background-color: red}
#box2{background-color: yellow}
#box3{background-color: blue}
#box4{background-color: green}
</style>
</head>
<body>
<div id="box">
<div id="box1"></div>
<div id="box2"></div>
<div id="box3"></div>
<div id="box4"></div>
<div id="box5"></div>
</div>
</body>
<script>
var box = document.getElementById('box');
var box1 = document.getElementById('box1');
var box2 = document.getElementById('box2');
var box3 = document.getElementById('box3');
var box4 = document.getElementById('box4');
var box5 = document.getElementById('box5');
box1.onclick = function(){
box.style.backgroundColor = 'red';
}
box2.onclick = function(){
box.style.backgroundColor = 'yellow';
}
box3.onclick = function(){
box.style.backgroundColor = 'blue';
}
box4.onclick = function(){
box.style.backgroundColor = 'green';
}
box5.onclick = function(){
box.style.backgroundColor = 'transparent';
}
</script>
</html>
开始注释了,代码浓缩在一起了,不难理解
html基本标签这块儿就不说了,先说body下的文本样式吧
<body>
<div id="box">
<div id="box1"></div>
<div id="box2"></div>
<div id="box3"></div>
<div id="box4"></div>
<div id="box5"></div>
</div>
</body>
最后要用到JS,在这里写以 “ id ” 命名的话,等下可以少写一些代码。

第一个跟第四个是有区别的,区别在于第一个颜色是透明,而第二个颜色是红色—跟底色相同。
<style>
#box{width: 400px;
height: 400px;background-color: red;border: 1px #000 solid;}
#box>div{float:right;width: 30px;
height: 30px;margin:10px;border: 1px #333 solid;}
#box1{background-color: red}
#box2{background-color: yellow}
#box3{background-color: blue}
#box4{background-color: green}
#box5{}
</style>
这块儿是Css样式,
width:设置盒子宽度;height:设置盒子高度;background-color:设置盒子背景颜色;border:设置盒子边框
(1px是边框的粗细程度,#333是16进制颜色,solid是边框样式,solid代表实线);float:是浮动
(盒子底下充满了水,盒子漂浮起来了;left就是向左边漂浮,right就是向右边漂浮); margin:就是外边距
(盒子不喜欢挤在一起,为了避免挤压,我们让它距离上、下、左、右的任何东西都有一定的间隙);
red是红色;yellow是黄色;blue是蓝色;green是绿色
var box = document.getElementById('box');
var box1 = document.getElementById('box1');
var box2 = document.getElementById('box2');
var box3 = document.getElementById('box3');
var box4 = document.getElementById('box4');
var box5 = document.getElementById('box5');
这段是DOM选择器,单独选中每一个盒子,方便理解。如果想选中所有盒子,
var boxs = box.SelectorAll(‘div’);
这样一句就全部选中了
box1.onclick = function(){
box.style.backgroundColor = 'red';
}
中的transparent是背景颜色的默认值,写成这样就意味着还原它本来的样子,那就是透明了。
这句话的含义是:
选中你需要操作的box

是倒数第一个——红色的小方块
给了box 一个点击事件(onclick),function(){}是执行的函数,
当box1被onclick的时候,box就function(){}
这样说就很容易理解了,那我们来看看function(){}里面都有什么

好简单啊,就这么一句。
这句话的意思就是让box的背景颜色变为红色(red);
style:风格,样式; backgroundColor:是背景颜色; (在JS中,“ - ”
一般不能正常使用,所以被替换成了下一个单词的首字母大写,也就是:
background-color ==> backgroundColor );
最后的:
box.style.backgroundColor = 'transparent';
总结
到此这篇关于前端html换肤功能的实现代码的文章就介绍到这了,更多相关前端html换肤内容请搜索脚本之家以前的文章或继续浏览下面的相关文章,希望大家以后多多支持脚本之家!
来源:脚本之家
链接:https://www.jb51.net/web/741596.html
申请创业报道,分享创业好点子。点击此处,共同探讨创业新机遇!


